This time, I spent 2 hours learning how to use a Japanese-style hand plane.
So I’m going to整理 the way to use a hand plane here.
1. Structure of the hand plane

The plane consists of the plane body, plane blade (main blade), and chipbreaker.
When you insert the main blade and the chipbreaker into the inside of the blade bed, the chipbreaker presses down on the main blade.
The chipbreaker both holds the main blade in place and breaks the shavings so that the blade does not dig too deeply into the wood.
2. Setting up the hand plane
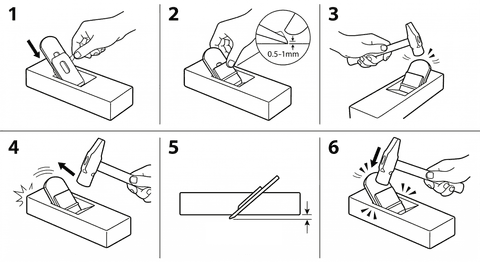
First insert the main blade into the plane, then fit the chipbreaker.
At this time, the end of the chipbreaker should protrude about 0.5–1 mm beyond the end of the main blade, and the end of the chipbreaker should be in full contact with the main blade.

You can adjust it by lightly tapping the chipbreaker with a hammer.
If the chipbreaker has gone in too deep, tap the side of the plane’s head (end grain side) to pull it back out.
At first, insert the blade so that it doesn’t protrude at all, then tap the back of the main blade with a hammer to adjust, bit by bit, how far the blade comes out of the sole.

Seen from the side, the blade should stick out only about the thickness of a hair.
In the photo above, the blade has been extended a lot just for the sake of the picture.
If the blade sticks out too much, you need a lot of force when pulling, and too much material will be removed at once.
If the main blade is protruding too much, tap the sides of the plane head (end grain) alternately, as indicated by the arrows below, to retract it.

If the left and right sides are uneven, tap the sides of the main blade to adjust how much it sticks out.
At first you may have no idea how to do this, but after setting it up a few times you’ll get used to it quickly.
3. Direction of planing

The direction of planing should be decided by looking at the wood grain.
If you plane in the direction the grain is running toward, as on the right, the blade will dig into the grain and tear out the wood.
You can clearly feel that it’s rough when you touch it with your hand.
4. Posture and force when planing

For a right-handed person, the left hand holds the head of the plane, and the right hand holds the body.
At this time, press down with your left hand and pull back with your right hand.
Place your left foot forward and your right foot back, and use your body to pull.


If you apply downward force with your right hand instead of pulling, the wood will lift at the far end.
When this happens, the plane will gouge more out of the end of the board, and the finish won’t be good.
At the end, it’s better to slightly lift the plane with your right hand.
5. Flattening lumber – crown and hollow, side twist

When you look at a piece of lumber from the side, sometimes it’s crowned (bulging) or hollowed.
In that case, place the hollow side down and plane the crowned side first; this is more stable.
Look from the side or use a square, and mark the areas that need to be planed with a pencil.
Then, when you plane, you’ll see the pencil marks being shaved away.

Sometimes the board is twisted so that either the left or right side is higher or lower.
In that case, you can plane down the high side.
If you look closely at the edge of the blade, it’s not perfectly straight; it’s slightly curved.
So, depending on where the wood is positioned under the sole of the plane, the amount removed will differ.

If the right side is high, shift the plane to the right; if the left is high, shift it to the left and plane.
Keep checking the side of the wood and repeat until the surface is flat.

6. Establishing a reference face
Once you’ve made one face square through the process above, mark that face with pencil lines.
This face is your reference face for measuring length, and you should position this properly squared face to the inside of the furniture.
They say that putting the well-prepared side inward prevents the furniture from twisting.

7. Flattening the opposite face
Now it’s time to flatten the opposite side using the first face as a reference.
Using the reference face, scribe the desired dimension of the stock with a marking gauge.
If you try to scribe with the marking gauge in one go, it will follow the grain of the wood, so draw the line in three passes.
First very lightly, then with a bit more pressure, and finally scribe firmly.

Then plane down to the line.
At first, since you have a lot to remove, extend the blade more and take heavier cuts.
As you get close to the marking-gauge line, retract the blade and take lighter cuts.
Since it’s bothersome to keep resetting, carpenters usually use two planes: one for roughing and one for finishing.

Once you’ve planed it down, you need to keep checking the thickness.
After repeated planing, the very front measured about 39.8 mm and the back about 40.5 mm.
So I planed a bit more off the back, then gave the whole thing a final pass to finish.

8. Maintaining the hand plane
Because the body of the plane is also wood, it can twist or deform over time.
In that case, place sandpaper on a reliably flat surface and lightly true the sole of the plane.

First mark the entire sole with pencil, then plane the whole bottom on the sandpaper; the high spots will be abraded away first.
Of course, before doing this work, you must retract the blade fully into the body.

10. Thoughts after class
Compared to using a saw or machines, planing felt extremely neat and refined.
There’s no sawdust flying everywhere, and the feel of the shavings is wonderfully soft, like smooth paper.
I learned chisel work last time when making a tray, and now that I’ve learned sawing and planing, I feel like I could make just about anything with hand tools if I set my mind to it.
As long as you use them safely, machines are quick to learn.
But if you’ve learned these hand skills, the level of refinement at the very end, in the finishing, becomes completely different.
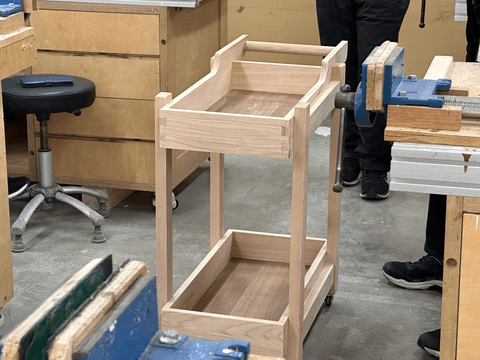
From the next class we’ll each be making a small piece of furniture, and I’m really looking forward to it.
Waiting for class while designing the furniture is going to be a truly enjoyable time.


댓글을 불러오는 중...