从以前开始就一直在写咖啡馆、美食博客,每次上传照片时都要对脸部进行马赛克处理,实在太麻烦了。
虽然在Naver和Tistory也有自动马赛克功能,但如果有30张照片,就要一一点击,而且识别率也不好。
所以我决定自己做一个。
1. 文件夹结构
文件夹结构如下。
在名为mosaic的文件夹内部,按照各个咖啡馆标识创建文件夹和放入照片。
在遍历这些路径时,会对图像进行马赛克处理。
root
├─ face.py
└─ mosaic
	├─ 咖啡馆后记
	│	└─ 图片.png
	└─ 咖啡馆后记
		└─ 图片.jpg
2. 训练模型
为了运营一个博客而训练面部模型是很麻烦的。
不过有天使已经把人脸全部训练好了。
我们只需点击一下下载模型即可。
3. 加载图像
首先用pathlib和opencv来加载图像。
问题是opencv无法识别韩文路径。
我们通过编写函数来解决这个问题。
from pathlib import Path
import cv2

def imread(file, flags=cv2.IMREAD_COLOR, dtype=np.uint8):
    try:
        n = np.fromfile(file, dtype)
        img = cv2.imdecode(n, flags)
        return img
    except Exception as e:
        print(e)
        return None

def imwrite(file, img, params=None):
    try:
        suffix = Path(file).suffix
        result, n = cv2.imencode(suffix, img, params)

        if result:
            with open(file, mode='w+b') as f:
                n.tofile(f)
            return True
        else:
            return False
    except Exception as e:
        print(e)
        return False
然后通过pathlib的iterdir和is_dir进行双for循环来检查内部文件。
仅在图像扩展名为图像文件时加载。
偶尔YOLO也会误判马赛克,所以也另外创建了备份文件夹。
rootpath = Path.cwd()
blur_ratio = 100
folders = Path.cwd()
for folder in folders.iterdir():
    if folder.is_dir():
        backupFolder = folder / "backup"
        backupFolder.mkdir(exist_ok=True)
        for imgPath in folder.iterdir():
            if imgPath.suffix == ".png" or imgPath.suffix ==".jpg" or imgPath.suffix ==".JPG" or imgPath.suffix ==".jpeg" or imgPath.suffix ==".PNG":
                img = imread(str(imgPath))
4. 检测面部
GitHub上发布的面部检测代码非常简单。
加载图像和训练模型后,通过model.predict进行计算,并遍历内部获取面部位置。
from pathlib import Path
import matplotlib.pyplot as plt
import cv2
import numpy as np
from ultralytics import YOLO

cwd = Path.cwd()
model = YOLO(cwd / 'yolov11n-face.pt')
picture = cv2.imread(cwd "/faces.jpg")
results = model.predict(picture)

# iterate detection results
for model in results:
    img = np.copy(model.orig_img)
    para = model.boxes
    # iterate each object contour
    for box in para:
        x1, y1, x2, y2 = box.xyxy[0]
        x1, y1, x2, y2 = int(x1), int(y1), int(x2), int(y2)
        h, w = y2-y1, x2-x1
        picture = cv2.rectangle(picture, (x1,y1), (x2,y2), (255,0,0), 3)
picture = cv2.cvtColor(picture,cv2.COLOR_BGR2RGB)
plt.imshow(picture)
plt.show()
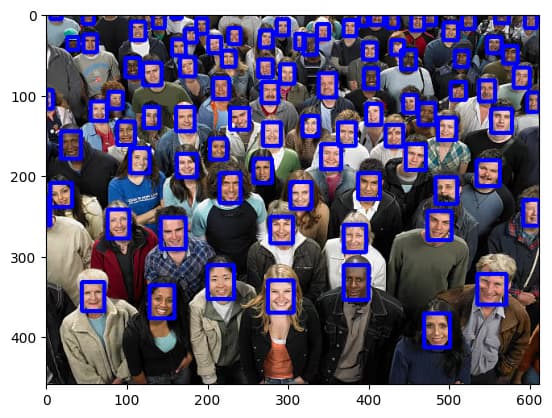
运行示例图像和代码后可以得到以下结果。

5. 完成代码
在上面的代码中,找到面部后,与其绘制框,不如进行模糊处理即可完成自动马赛克。
模糊处理是使用cv2.blur对图像进行模糊处理,然后将相应位置的图像替换为模糊图像。
以下是完整代码。
from pathlib import Path
import cv2
import numpy as np
from ultralytics import YOLO

def imread(file, flags=cv2.IMREAD_COLOR, dtype=np.uint8):
    try:
        n = np.fromfile(file, dtype)
        img = cv2.imdecode(n, flags)
        return img
    except Exception as e:
        print(e)
        return None

def imwrite(file, img, params=None):
    try:
        suffix = Path(file).suffix
        result, n = cv2.imencode(suffix, img, params)

        if result:
            with open(file, mode='w+b') as f:
                n.tofile(f)
            return True
        else:
            return False
    except Exception as e:
        print(e)
        return False

rootpath = Path.cwd()
model = YOLO(rootpath/'yolov11n-face.pt')
blur_ratio = 100
folders = Path(rootpath/"mosaic")
for folder in folders.iterdir():
    if folder.is_dir():
        backupFolder = folder / "backup"
        backupFolder.mkdir(exist_ok=True)
        for imgPath in folder.iterdir():
            if imgPath.suffix == ".png" or imgPath.suffix ==".jpg" or imgPath.suffix ==".JPG" or imgPath.suffix ==".jpeg" or imgPath.suffix ==".PNG":
                img = imread(str(imgPath))
                backupImgPath = backupFolder / f"{imgPath.stem}.webp"
                imwrite(str(backupImgPath), img, [cv2.IMWRITE_WEBP_QUALITY, 90])
                results = model.predict(img, show=False)
                boxes = results[0].boxes.xyxy.cpu().tolist()

                for box in boxes:
                    obj = img[int(box[1]):int(box[3]), int(box[0]):int(box[2])]
                    blur_obj = cv2.blur(obj, (blur_ratio, blur_ratio))
                    img[int(box[1]):int(box[3]), int(box[0]):int(box[2])] = blur_obj
                # iterate detection results
                newImgPath = imgPath.parent / f"{imgPath.stem}.webp"
                imgPath.unlink()
                imwrite(str(newImgPath), img, [cv2.IMWRITE_WEBP_QUALITY, 90])


댓글을 불러오는 중...