예전부터 카페, 맛집 블로그를 계속 쓰고 있었는데 사진을 올릴 때 마다 얼굴을 모자이크 하는게 너무 귀찮았다.
네이버, 티스토리에서도 자동 모자이크를 지원하지만, 사진이 30개면 30개를 모두 돌아가면서 눌러줘야하고 인식률도 좋지 않았다.
그래서 그냥 만들기로 했다.
1. 폴더구조
폴더 구조는 아래와 같다.
masaic라는 폴더 내부에 각 카페 이듬들 별로 폴더와 사진이 들어 있다.
해당 경로들을 탐색하며 이미지를 모자이크 해준다.
root
├─ face.py
└─ mosaic
	├─ 힘센캥거루카페 후기
	│	└─ 이미지들.png
	└─ 힘약한캥거루카페 후기
		└─ 이미지들.jpg
2. 학습모델
블로그 하나 운영하겠다고 얼굴 학습시키는건 무리다.
또 어떤 천사가 사람 얼굴을 모두 학습시켜 두셨다.
우리는 모델 하나를 클릭으로 다운받자.
3. 이미지 불러오기
먼저 pathlib과 opencv로 이미지를 불러오는 것 부터 해보자.
문제는 opencv가 한글 경로를 인식하지 못한다는 것.
이건 함수로 만들어서 해결해보자.
from pathlib import Path
import cv2

def imread(file, flags=cv2.IMREAD_COLOR, dtype=np.uint8):
    try:
        n = np.fromfile(file, dtype)
        img = cv2.imdecode(n, flags)
        return img
    except Exception as e:
        print(e)
        return None

def imwrite(file, img, params=None):
    try:
        suffix = Path(file).suffix
        result, n = cv2.imencode(suffix, img, params)

        if result:
            with open(file, mode='w+b') as f:
                n.tofile(f)
            return True
        else:
            return False
    except Exception as e:
        print(e)
        return False
그리고 pathlib으로는 iterdir과 is_dir을 이용해 2중 for문을 돌면서 내부 파일들을 확인하면 된다.
이미지의 확장자가 이미지 파일일 때만 불러오도록 하자.
간혹 YOLO에서도 모자이크를 잘못하는 경우가 있기 때문에 backup 폴더도 따로 만들어 주었다.
rootpath = Path.cwd()
blur_ratio = 100
folders = Path.cwd()
for folder in folders.iterdir():
    if folder.is_dir():
        backupFolder = folder / "backup"
        backupFolder.mkdir(exist_ok=True)
        for imgPath in folder.iterdir():
            if imgPath.suffix == ".png" or imgPath.suffix ==".jpg" or imgPath.suffix ==".JPG" or imgPath.suffix ==".jpeg" or imgPath.suffix ==".PNG":
                img = imread(str(imgPath))
4. 얼굴 검출하기
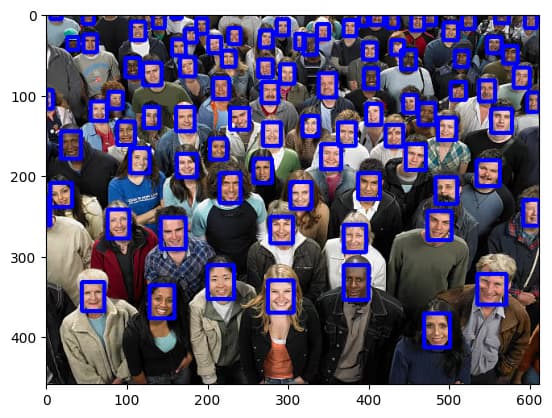
깃허브에 올라와있는 얼굴 검출 코드는 무척 단순하다.
이미지, 학습 모델을 불러온 뒤, model.predict으로 연산하고 내부를 순회하면서 얼굴을 포지션을 불러온다.
from pathlib import Path
import matplotlib.pyplot as plt
import cv2
import numpy as np
from ultralytics import YOLO

cwd = Path.cwd()
model = YOLO(cwd / 'yolov11n-face.pt')
picture = cv2.imread(cwd "/faces.jpg")
results = model.predict(picture)

# iterate detection results
for model in results:
    img = np.copy(model.orig_img)
    para = model.boxes
    # iterate each object contour
    for box in para:
        x1, y1, x2, y2 = box.xyxy[0]
        x1, y1, x2, y2 = int(x1), int(y1), int(x2), int(y2)
        h, w = y2-y1, x2-x1
        picture = cv2.rectangle(picture, (x1,y1), (x2,y2), (255,0,0), 3)
picture = cv2.cvtColor(picture,cv2.COLOR_BGR2RGB)
plt.imshow(picture)
plt.show()
예제 이미지와 코드를 실행하면 아래와 같은 결과를 얻을 수 있다.

5. 코드 완성하기
위의 코드에서 얼굴을 찾은 후 박스를 그리는게 아니라 블러 처리를 하면 자동 모자이크는 완성이다.
블러 처리는 이미지를 cv2.blur로 블러한 뒤, 해당 위치의 이미지를 블러된 이미지로 치환 하면 된다.
아래는 전체 코드이다.
from pathlib import Path
import cv2
import numpy as np
from ultralytics import YOLO

def imread(file, flags=cv2.IMREAD_COLOR, dtype=np.uint8):
    try:
        n = np.fromfile(file, dtype)
        img = cv2.imdecode(n, flags)
        return img
    except Exception as e:
        print(e)
        return None

def imwrite(file, img, params=None):
    try:
        suffix = Path(file).suffix
        result, n = cv2.imencode(suffix, img, params)

        if result:
            with open(file, mode='w+b') as f:
                n.tofile(f)
            return True
        else:
            return False
    except Exception as e:
        print(e)
        return False

rootpath = Path.cwd()
model = YOLO(rootpath/'yolov11n-face.pt')
blur_ratio = 100
folders = Path(rootpath/"mosaic")
for folder in folders.iterdir():
    if folder.is_dir():
        backupFolder = folder / "backup"
        backupFolder.mkdir(exist_ok=True)
        for imgPath in folder.iterdir():
            if imgPath.suffix == ".png" or imgPath.suffix ==".jpg" or imgPath.suffix ==".JPG" or imgPath.suffix ==".jpeg" or imgPath.suffix ==".PNG":
                img = imread(str(imgPath))
                backupImgPath = backupFolder / f"{imgPath.stem}.webp"
                imwrite(str(backupImgPath), img, [cv2.IMWRITE_WEBP_QUALITY, 90])
                results = model.predict(img, show=False)
                boxes = results[0].boxes.xyxy.cpu().tolist()

                for box in boxes:
                    obj = img[int(box[1]):int(box[3]), int(box[0]):int(box[2])]
                    blur_obj = cv2.blur(obj, (blur_ratio, blur_ratio))
                    img[int(box[1]):int(box[3]), int(box[0]):int(box[2])] = blur_obj
                # iterate detection results
                newImgPath = imgPath.parent / f"{imgPath.stem}.webp"
                imgPath.unlink()
                imwrite(str(newImgPath), img, [cv2.IMWRITE_WEBP_QUALITY, 90])
댓글을 불러오는 중...