Today I’m going to write about how to clone an RFID card with an Arduino.
Once I write something down I don’t forget it, so I’m leaving this here as a form of review.
1. Internal data structure of an RFID card
A typical RFID card is a MIFARE Classic 1K card.
The memory structure of this card is as follows.
- Total 1024 bytes (1KB)
- 16 Sectors (0~15)
- Each Sector has 4 Blocks (Block 0~3)
- Each Block is 16 bytes
Each sector has the following structure.
Sector n
 ├── Block 0 (Data or UID block)
 ├── Block 1 (Data)
 ├── Block 2 (Data)
 └── Block 3 (Sector Trailer: Key A, Access Bits, Key B)
Among these sectors, the one with the most important meaning is the first data of Sector 0.
The UID is stored there.

2. UID
Short for Unique Identifier, this is the unique identification number assigned to each RFID card (e.g., transit cards, access cards, student IDs, etc.).
For a person, it plays a role similar to a social security number.
The UID is stored in the first 4 bytes inside Block 0 of Sector 0.
[ UID0 | UID1 | UID2 | UID3 | BCC | Manufacturer Data… ]This is the first part read by an RFID reader when it reads a card.
Based on this, the card is identified.

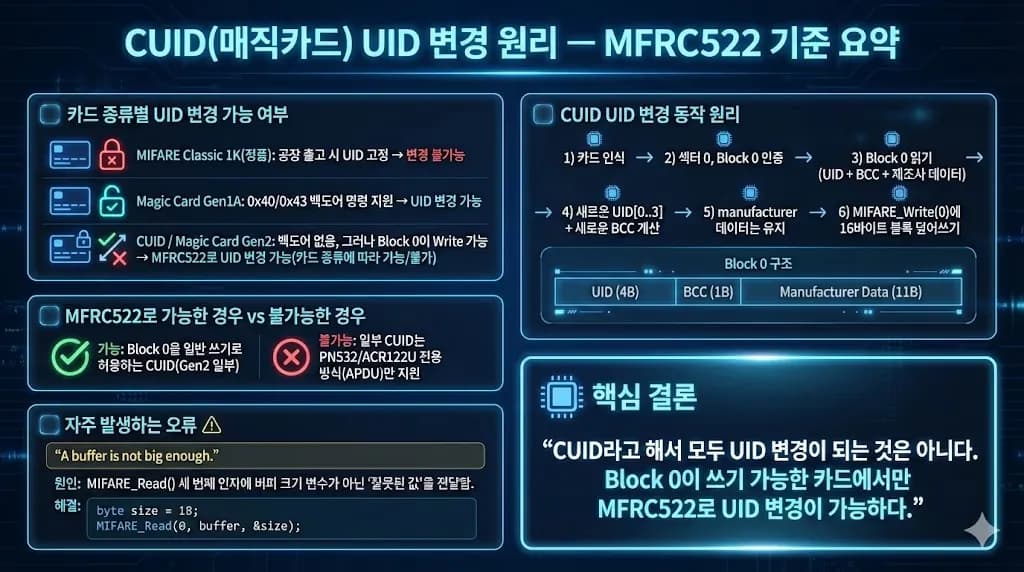
3. CUID card
The important point is that the UID of a genuine MIFARE Classic 1K is fixed at the factory.
On genuine NXP chips, the UID is stored in ROM and cannot be modified by any means.
Therefore, you cannot tamper with the UID using a normal card reader or an MFRC522.

However, there are cards on the market whose UID can be changed, and these are called CUID cards (aka magic cards).
The C at the front stands for Changeable.
Externally they look the same as MIFARE Classic 1K, but the internal chip is different as follows.
① Gen1A (UID/Backdoor supported type)
Supports 0x40 / 0x43 backdoor commands
Provides separate commands for changing the UID
The UID can be changed with MFRC522 + Arduino library using MIFARE_SetUid()
② CUID / Gen2 (Block 0 Writable)
No backdoor commands
Instead, designed so that Block 0 (the sector containing the UID) can be overwritten with a normal WRITE
If the MFRC522 accepts the MIFARE_Write(0…) command, you can change the UID
However, not all CUID cards will work. If the MFRC522 doesn’t support it, you’ll need PN532/ACR122U
4. Cloning an RFID card with Arduino
Now that we know the principle, cloning an RFID card using Arduino is simple.
You just need to clone the UID.
First, connect the Arduino as shown below.
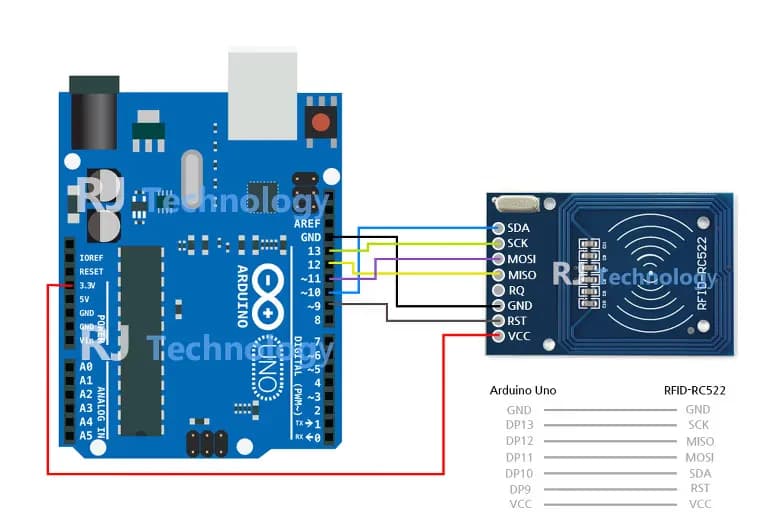
Signal | MFRC522 Pin | Arduino Uno / 101 | Arduino Mega | Arduino Nano v3 | Arduino Leonardo / Micro | Arduino Pro Micro |
|---|---|---|---|---|---|---|
RST / Reset | RST | 9 | 5 | D9 | RESET / ICSP-5 | RST |
SPI SS | SDA (SS) | 10 | 53 | D10 | 10 | 10 |
SPI MOSI | MOSI | 11 / ICSP-4 | 51 | D11 | ICSP-4 | 16 |
SPI MISO | MISO | 12 / ICSP-1 | 50 | D12 | ICSP-1 | 14 |
SPI SCK | SCK | 13 / ICSP-3 | 52 | D13 | ICSP-3 | 15 |
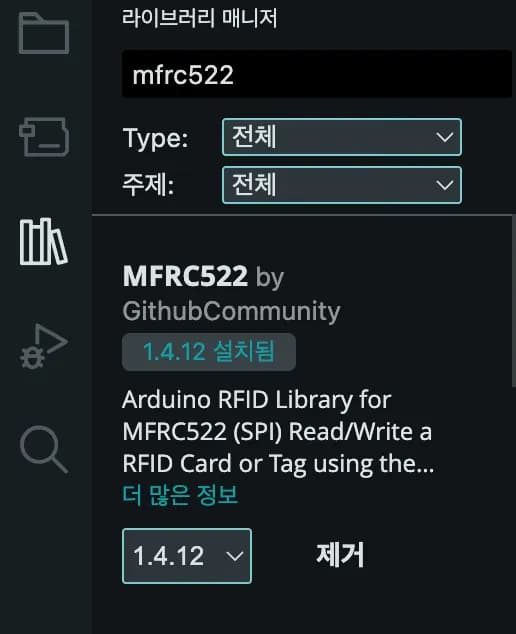
Then, in the Arduino IDE, search for and install the MFRC522 library.
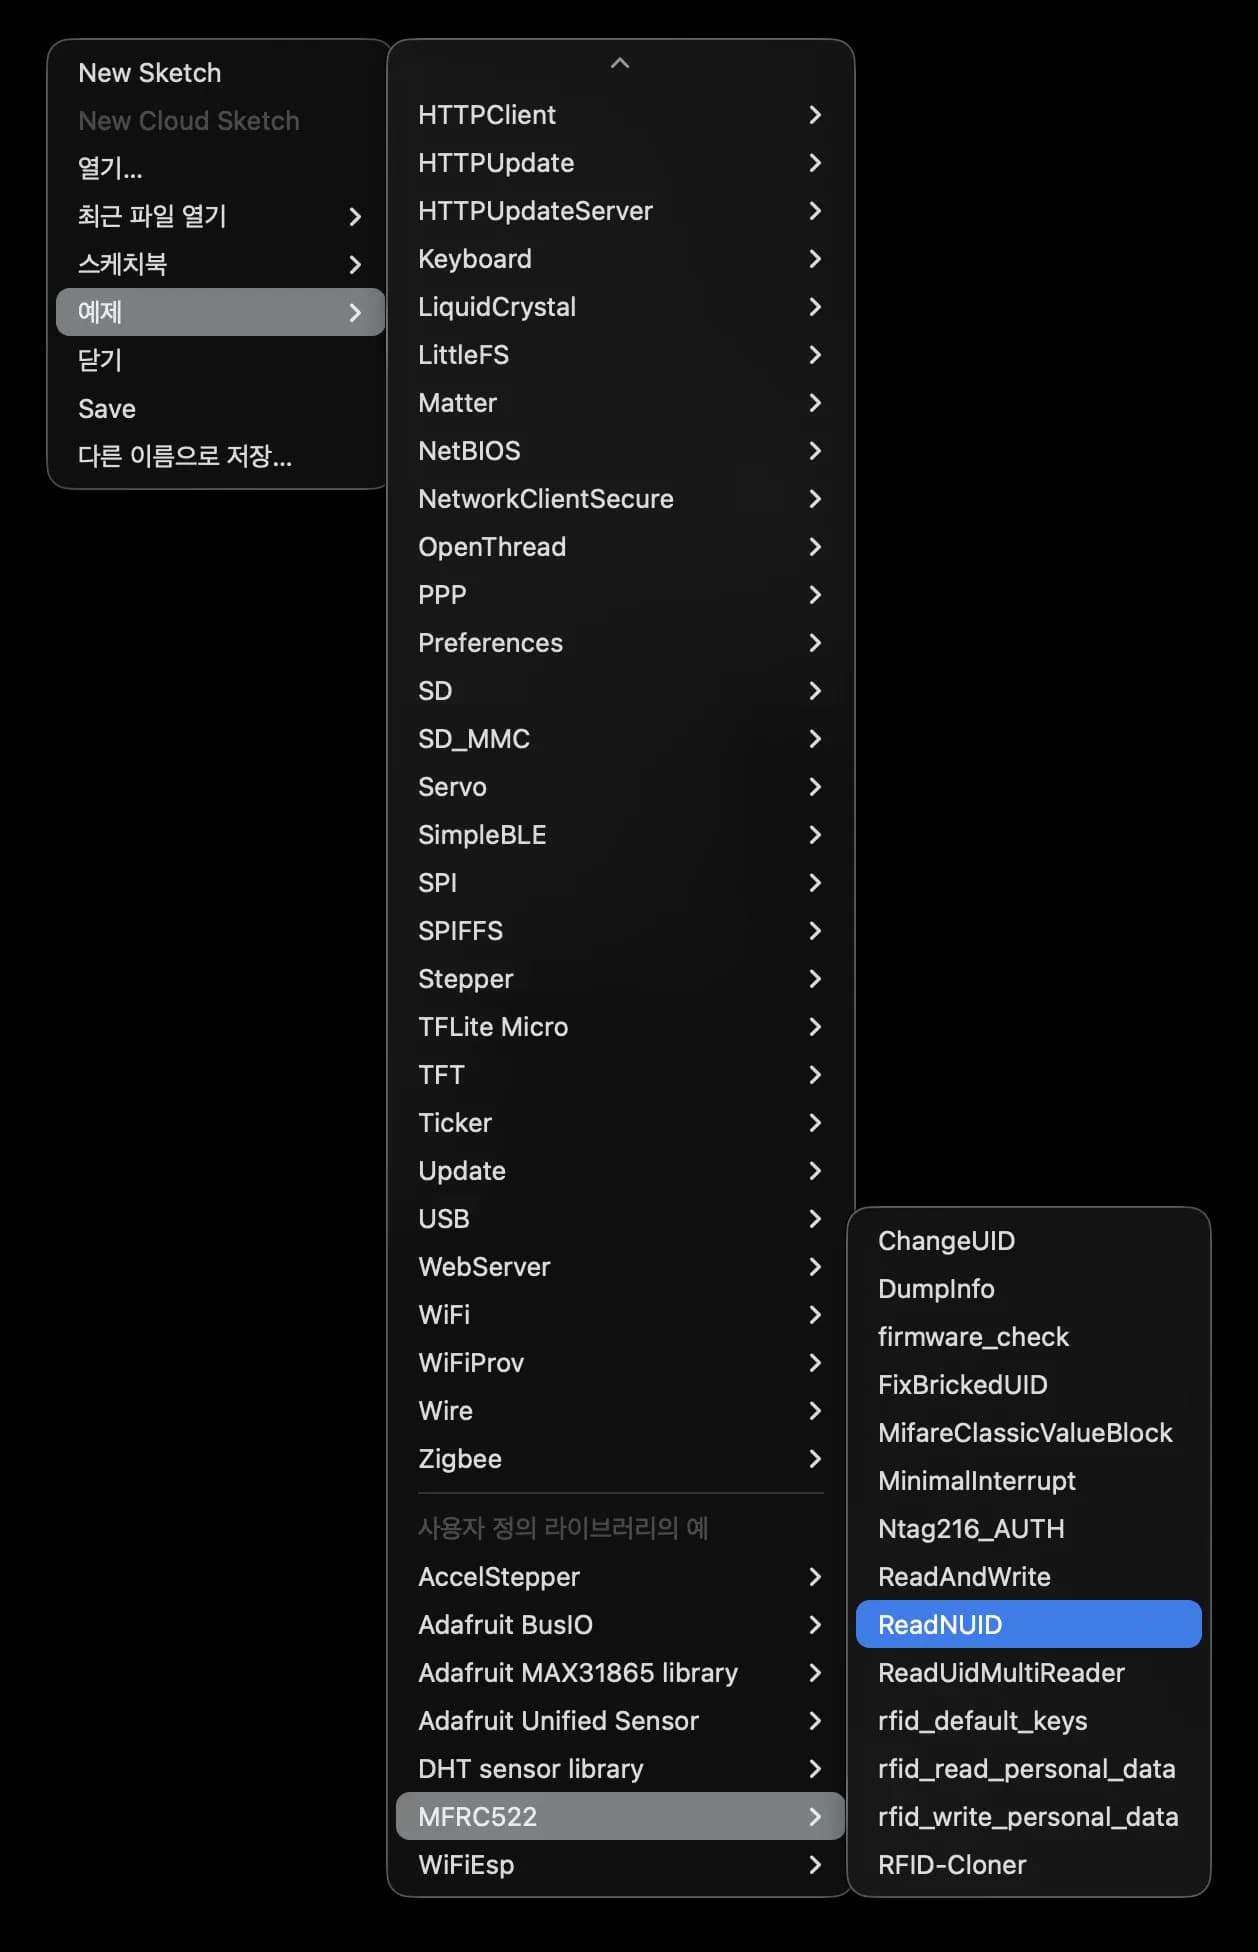
Now go to File -> Examples -> MFRC522 and select ReadNUID.
After uploading that code, first read the UID value.
The UID is generally made up of four hexadecimal values.
F5 5F 36 80If you obtained a UID like the one above, the UID to upload will be as follows.
The 0x in front of the numbers means that the numbers are in hexadecimal.
0xF5 0x5F 0x36 0x805. Problems, and solution
I wanted to conveniently solve the problem using ChangeUID from the examples, but it kept failing.
The 0x40 backdoor kept timing out.
It turned out my card was a Gen2 card, so I only needed to access sector 0 and replace the UID.
The code is as follows.
#include <SPI.h>
#include <MFRC522.h>

#define RST_PIN  9
#define SS_PIN   10

MFRC522 mfrc522(SS_PIN, RST_PIN);
MFRC522::MIFARE_Key key;

// New UID you want to set (4 bytes)
byte newUid[4] = { 0xF5, 0x5F, 0x36, 0x80 };  // Example

void setup() {
  Serial.begin(9600);
  while (!Serial) {}

  SPI.begin();
  mfrc522.PCD_Init();
  Serial.println(F("Example of writing UID directly to Block 0 of a CUID card"));

  // Set default key FF..FF
  for (byte i = 0; i < 6; i++) {
    key.keyByte[i] = 0xFF;
  }
}

void loop() {
  // Wait for new card
  if (!mfrc522.PICC_IsNewCardPresent() || !mfrc522.PICC_ReadCardSerial()) {
    return;
  }

  Serial.print(F("Current card UID: "));
  for (byte i = 0; i < mfrc522.uid.size; i++) {
    Serial.print(mfrc522.uid.uidByte[i], HEX);
    Serial.print(" ");
  }
  Serial.println();

  // === 1. Authenticate Sector 0 (Block 0) ===
  byte block = 0;  // Block 0
  MFRC522::StatusCode status;

  status = mfrc522.PCD_Authenticate(
      MFRC522::PICC_CMD_MF_AUTH_KEY_A,
      block,
      &key,
      &(mfrc522.uid)
  );

  if (status != MFRC522::STATUS_OK) {
    Serial.print(F("Authentication failed: "));
    Serial.println(mfrc522.GetStatusCodeName(status));
    goto HALT;
  }

  // === 2. Read existing Block 0 content to preserve manufacturer data ===
  byte block0[18];  // 16 bytes + size info
  byte size = sizeof(block0);
  status = mfrc522.MIFARE_Read(0, block0, &size);

  if (status != MFRC522::STATUS_OK) {
    Serial.print(F("Block 0 read failed: "));
    Serial.println(mfrc522.GetStatusCodeName(status));
    goto HALT;
  }

  // block0[0..3] = original UID
  // block0[4]    = BCC (XOR of 4 UID bytes)
  // block0[5..15]= manufacturer data, etc.

  // === 3. Overwrite with new UID + calculated BCC ===
  byte bcc = newUid[0] ^ newUid[1] ^ newUid[2] ^ newUid[3];

  block0[0] = newUid[0];
  block0[1] = newUid[1];
  block0[2] = newUid[2];
  block0[3] = newUid[3];
  block0[4] = bcc;
  // block0[5..15] left as-is to preserve manufacturer data

  status = mfrc522.MIFARE_Write(0, block0, 16);
  if (status != MFRC522::STATUS_OK) {
    Serial.print(F("Block 0 write failed: "));
    Serial.println(mfrc522.GetStatusCodeName(status));
    goto HALT;
  }

  Serial.println(F("New UID written. Remove the card and tap it again."));

HALT:
  mfrc522.PICC_HaltA();
  mfrc522.PCD_StopCrypto1();

  delay(1000);
}
6. Thoughts
This time I really learned how to properly use the RFID module.
When you search online, you often see projects that open doors using key cards, and it seems those can be implemented quite easily as well.
I’d like to try various applications.
For reference, if the card is still not recognized with this method, it’s highly likely to be a frequency issue (13.56MHz, 125KHz, etc.).
If you have any questions, please leave a comment.


댓글을 불러오는 중...