
I wanted to do pagination and searched for articles, but there were few, and they didn’t fully satisfy me.
Most blog articles I found included examples using useState and API.
This approach is easy to implement but fails to leverage the benefits of server-side rendering.
Today, I’ll try to implement pagination in Next.js using server-side rendering (SSR).
Of course, the article I referenced is the official documentation.
1. SSR Pagination Idea
The core of this article is that the page component receives query strings as input.
Using query strings offers the following advantages:
Bookmarking and URL Sharing: Since search parameters are in the address bar, sharing or bookmarking is possible.
Server-side Rendering: Initial state can be rendered directly from the server.
Analysis and Tracking: User behavior can be tracked without additional client-side code.
Let’s look at the code now.
You can parse the query string with searchParams from the prop.
export default async function Page(props: {
  searchParams?: Promise<{
    query?: string;
    page?: string;
  }>;
}) {
  const searchParams = await props.searchParams;
  const query = searchParams?.query || "";
  const currentPage = Number(searchParams?.page) || 1;

  return (
    <div>
      <p>searchParams</p>
      <p>currentPage</p>
    </div>
  );
}
If I access '/test?page=1&query="strongkangaroo"', I can see the query output inside the div.
Now all that’s left is to season this query nicely.
2. Implementing the Search Box
We take the component for the search from the official documentation.
For now, I have made it so that when a search term is entered, it only logs to the browser console.
"use client";

import { MagnifyingGlassIcon } from "@heroicons/react/24/outline";

export default function Search({ placeholder }: { placeholder: string }) {
  function handleSearch(term: string) {
    console.log(term);
  }

  return (
    <div className="relative flex flex-1 flex-shrink-0">
      <label htmlFor="search" className="sr-only">
        Search
      </label>
      <input
        className="peer block w-full rounded-md border
        border-gray-200 py-[9px] pl-10 text-sm outline-2
         placeholder:text-gray-500"
        placeholder={placeholder}
        onChange={(e) => {
          handleSearch(e.target.value);
        }}
      />
      <MagnifyingGlassIcon className="absolute left-3 top-1/2 h-[18px] w-[18px] -translate-y-1/2 text-gray-500 peer-focus:text-gray-900" />
    </div>
  );
}
Then I added it to the layout component as shown below.
You can put it in the component, or anywhere else—it doesn’t matter.
export default async function Layout({
  children,
}: {
  children: React.ReactNode;
}) {
  return (
    <div className="mx-auto max-w-screen-xl w-full prose">
      <div className="flex justify-between">
        <div>
          <h1>List</h1>
        </div>
        <div className="w-80">
          <Search placeholder="Enter search term" /> // Search box
        </div>
      </div>
      <div className="mb-8">
        <TagGroup path="/category" tags={tagsArray} />
      </div>
      <div>{children}</div>
    </div>
  );
}
Now let's enter a search term and look at the console log.
You’ll see that it logs input each time an input occurs.

Now, call useSearchParams, usePathname, useRouter, and create objects.
Check out the code and comments below.
"use client";

import { MagnifyingGlassIcon } from "@heroicons/react/24/outline";
import { useSearchParams, usePathname, useRouter } from "next/navigation";

export default function Search() {
  const searchParams = useSearchParams();
  // Call useSearchParams
  const pathname = usePathname();
  // Use the existing URL path with usePathname
  const { replace } = useRouter();
  // Replace the existing address with useRouter’s replace
  function handleSearch(term: string) {
    const params = new URLSearchParams(searchParams);
    // Create query strings with the built-in URLSearchParams
    if (term) {
      params.set("query", term); // Reassign if there is an input value
    } else {
      params.delete("query"); // Delete if there is no value
    }
    replace(`${pathname}?${params.toString()}`);
    // Replace the address bar's URL by adding generated query string in front of the original URL address.
  }
  // ...
}
After writing this code, you can see that the address changes when you enter something in the search box.
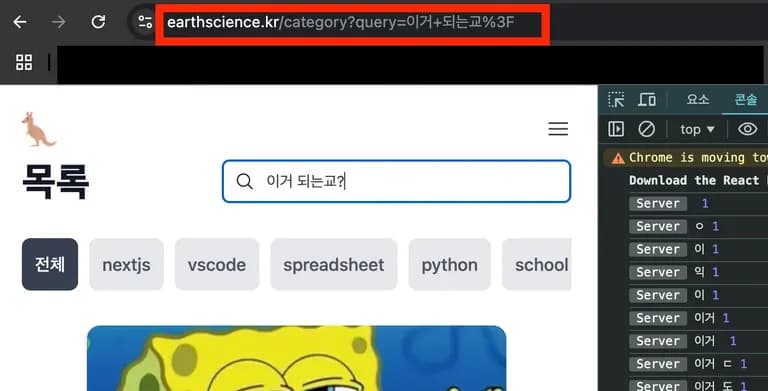
However, if you type '/category?query=doesThisWork' in the address bar and enter, you'll see that the input field is empty.
To sync the query in the address bar with the search input, add the following code to the input.
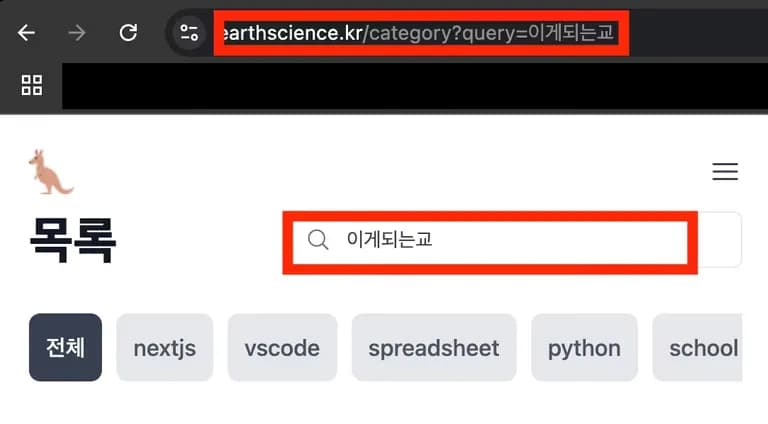
After entering defaultValue, if you access via URL using 'query', the input value will be synced.
<input
  // ...
  defaultValue={searchParams.get("query")?.toString()}
  // ...
/>
There is an issue here.
Changes occur every time a vowel or consonant is typed one by one.
Let’s modify it so that it executes 300ms after the last input in the search box occurs.
This is called debounce, and installing a library is better for mental health.
yarn add use-debounceThen change the code as shown below.
Call debounce, and wrap the handleSearch function with useDebouncedCallback.
If you put 300 at the end, the address will change 300ms after the last input is executed.
// ...
import { useDebouncedCallback } from "use-debounce";

const handleSearch = useDebouncedCallback((term) => {
  const params = new URLSearchParams(searchParams);
  if (term) {
    params.set("query", term);
  } else {
    params.delete("query");
  }
  replace(`${pathname}?${params.toString()}`);
}, 300);
The server side now just needs to parse the query and return only the necessary information.
3. Implementing Server-side Search Functionality
The server-side will probably differ for everyone.
In my case, I am using metadata from each MDX file stored in JSON format.
Then, use the query from the address bar to filter and return it to the component.
import getPostCategory from "@/utils/getPostCategory";
import CategoryPage from "@/components/blog/CategoryPage";
import { postCardObject } from "@/types/allTypes"; // This is a custom type definition.

export default async function Page(props: {
  searchParams?: Promise<{
    query?: string;
    page?: string;
  }>;
}) {
  const searchParams = await props.searchParams;
  const query = searchParams?.query?.toLowerCase() || "";
  const currentPage = Number(searchParams?.page) || 1;
  // Parse the query. Pagination is not yet implemented.
  // Convert to lowercase to avoid case sensitivity.

  let posts: postCardObject[] = await getPostCategory();
  // Retrieve all post data.

  if (query) {
    posts = posts.filter((post) => {
      const title = post.data.title.toLowerCase();
      return title.includes(query);
    });
  }
  // Reassign posts by filtering if there is a query.
  // Later, this will be cleanly moved to within getPostCategory and the query will be passed as a parameter.

  return (
    <>
      <CategoryPage postCategorys={posts} />
    </>
  ); // Then render as a list of posts.
}
Testing shows that posts are filtered according to the search term.
This completes the search functionality.
4. Implementing Pagination
Pagination is the same as implementing the search box.
Just pass the query string of the clicked page using useSearchParams, useRouter, usePathname.
There is a little difference though.
You must preassign the number of posts to display per page and the total pages in the component.
export default async function getPostCategory(
  perPagePosts: number,
  page = 1,
  tag?: string
) {
  // ...
  const totalPage = Math.ceil(postCategorys.length / perPagePosts);
  postCategorys = postCategorys.slice(
    0 + perPagePosts * (page - 1),
    perPagePosts + perPagePosts * (page - 1)
  );
  // ...
  return { postCategorys, totalPage };
}
I made it so the function fetching post data slices to 6 posts per page and returns the total number of pages.
Now create pages by dividing the total number of pages by 10.
Let’s roughly create it using Link and test it.
export default async function Page(props: {
  searchParams?: Promise<{
    query?: string;
    page?: string;
  }>;
}) {
  // ...
  return (
    <div>
      <CategoryPage postCategorys={postCategorys} />
      <div>
        {Array.from({ length: totalPage }, (_, i) => i + 1).map((i) => (
          <Link
            key={i}
            className={`mx-3 bg-gray-200 ${
              currentPage === i ? "bg-gray-700 text-white" : ""
            }`}
            href={`?page=${i}`}
          >
            page {i}
          </Link>
        ))}
      </div>
    </div>
  );
}

Following the above links, you can see posts are provided according to the query.
Now let’s create the 'use client' component.
Implementing this is quite tedious, so let’s leave it to Claude.
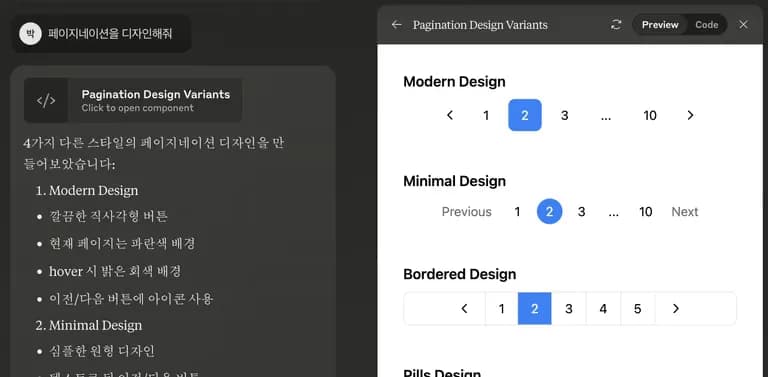
Ah... sweet...
Indeed, Claude is the big brother of React.
Pick the first one and review the code with a few changes.
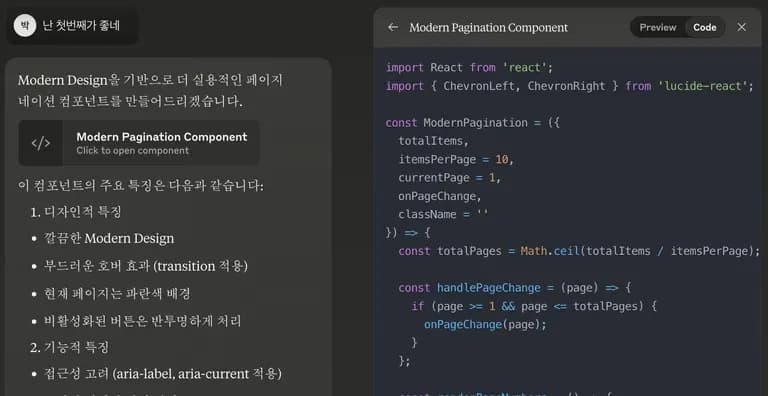
import { ChevronLeftIcon, ChevronRightIcon } from "@heroicons/react/24/outline";
import { useSearchParams, usePathname, useRouter } from "next/navigation";

export default function Pagination({
  totalItems,
  itemsPerPage = 10,
  className = "",
}: {
  totalItems: number;
  itemsPerPage: number;
  className?: string;
}) {
  const searchParams = useSearchParams();
  const pathname = usePathname();
  const { replace } = useRouter();
  const currentPage = Number(searchParams.get("page")) || 1;

  const totalPages = Math.ceil(totalItems / itemsPerPage);

  // Insert the clicked page into the address bar as a query
  function handlePageChange(page: number) {
    if (page >= 1 && page <= totalPages) {
      const params = new URLSearchParams(searchParams);
      params.set("page", page.toString());
      replace(`${pathname}?${params.toString()}`);
    }
  }

  // Create an array of pages to render
  function renderPageNumbers() {
    const pages = [];
    const showAroundCurrent = 2;

    const startPage: number = Math.max(1, currentPage - showAroundCurrent);
    const endPage: number = Math.min(
      totalPages,
      currentPage + showAroundCurrent
    );

    // Handle the beginning part
    if (startPage > 1) {
      pages.push(1);
      if (startPage > 2) {
        pages.push("...");
      }
    }

    // Numbers around the current page
    for (let i = startPage; i <= endPage; i++) {
      pages.push(i);
    }

    // Handle the end part
    if (endPage < totalPages) {
      if (endPage < totalPages - 1) {
        pages.push("...");
      }
      pages.push(totalPages);
    }

    return pages;
  }

  // The return below can be roughly reviewed.
  return (
    <div className={`flex items-center justify-center space-x-2 ${className}`}>
      <button
        onClick={() => handlePageChange(currentPage - 1)}
        disabled={currentPage === 1}
        className="p-2 rounded-lg hover:bg-gray-100 disabled:opacity-50 disabled:cursor-not-allowed transition-colors duration-200"
        aria-label="Previous page"
      >
        <ChevronLeftIcon className="w-5 h-5" />
      </button>

      {renderPageNumbers().map((page, index) => (
        <button
          key={index}
          onClick={() => typeof page === "number" && handlePageChange(page)}
          disabled={page === "..."}
          className={`
            px-4 py-2 rounded-lg transition-colors duration-200
            ${typeof page === "number" ? "hover:bg-gray-100" : ""}
            ${
              page === currentPage
                ? "bg-blue-500 text-white hover:bg-blue-600"
                : ""
            }
            ${page === "..." ? "cursor-default" : "cursor-pointer"}
            disabled:cursor-not-allowed
          `}
          aria-label={typeof page === "number" ? `Page ${page}` : "More pages"}
          aria-current={page === currentPage ? "page" : undefined}
        >
          {page}
        </button>
      ))}

      <button
        onClick={() => handlePageChange(currentPage + 1)}
        disabled={currentPage === totalPages}
        className="p-2 rounded-lg hover:bg-gray-100 disabled:opacity-50 disabled:cursor-not-allowed transition-colors duration-200"
        aria-label="Next page"
      >
        <ChevronRightIcon className="w-5 h-5" />
      </button>
    </div>
  );
}
After this, I added the pagination as a test to the category layout.
I arbitrarily set the total number of posts to 100 and the number of posts per page to 6.
// ...
export default async function Page(props: {
  searchParams?: Promise<{
    query?: string;
    page?: string;
  }>;
}) {
// ...
      <div>
        <Pagenation totalItems={100} itemsPerPage={6} />
      </div>
      <div>Testing pagination</div>
//...
}
It executes without issues.
Now, just properly pass totalItem and itemsPerPage from the server-side to the client component.
Of course, getPostCategory from the previous example needs a few tweaks.
5. Review
I thought a lot about how to implement pagination, and it was resolved in one shot.
The latest trend suggests that official documentation is better than books.
I hope my article helps you.


댓글을 불러오는 중...